Why Bandsaw Safety Matters More Than Most Beginners Realize
The bandsaw often gets overlooked in safety conversations because it lacks the aggressive reputation of other power tools in the shop. This quieter machine seems almost friendly by comparison, which is precisely why beginners tend to let their guard down around it. The reality is that most bandsaw injuries are entirely preventable and typically result from a handful of recurring mistakes rather than any inherent danger in the machine itself. When you understand what goes wrong and why, you can develop habits that keep your fingers intact while building confidence with this incredibly versatile tool. This guide focuses on practical bandsaw safety knowledge that will serve you from your first cut onward, addressing the specific errors that catch new users off guard and the smart shop practices that experienced woodworkers rely on every session.
The Most Common Beginner Mistakes That Lead to Bandsaw Injuries
- Leaving the blade guard positioned too high above the workpiece, sometimes several inches instead of the recommended distance
- Wearing loose clothing, dangling jewelry, or leaving long hair untied near the spinning blade and wheels
- Skipping eye protection for what feels like a quick or simple cut
- Reaching across the blade path to grab cutoffs or adjust material mid cut
- Feeding stock too quickly and forcing the blade through material rather than allowing it to cut at its own pace
- Making adjustments to blade tension, tracking, or guides while the machine is still running
- Using a blade that is too wide for the curves being cut, causing binding and potential breakage
- Forgetting to check that wheel covers are properly closed before powering on
Understanding the 4 Inch Rule and Why It Exists
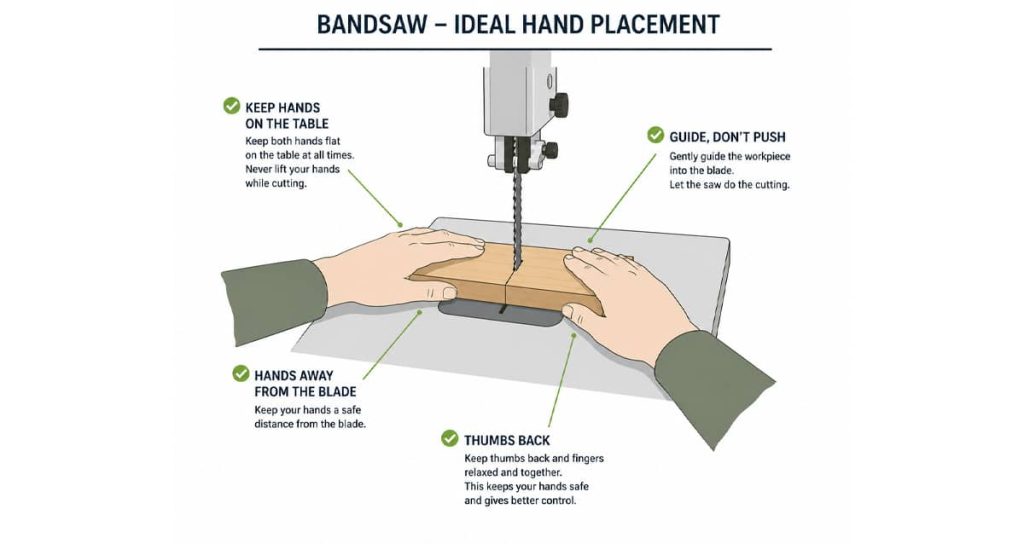
Hand placement around a bandsaw blade requires deliberate attention until it becomes second nature. The widely referenced 4 inch rule states that your hands should remain at least 4 inches away from the blade at all times during operation. This buffer zone accounts for the unexpected, whether that means a sudden slip, a blade catching on a knot, or a momentary lapse in concentration. For smaller workpieces that require your hands to come closer than this threshold, a push stick becomes your best friend. Some experienced woodworkers even extend this rule to 6 inches when working with harder materials or irregular stock that might behave unpredictably during the cut.
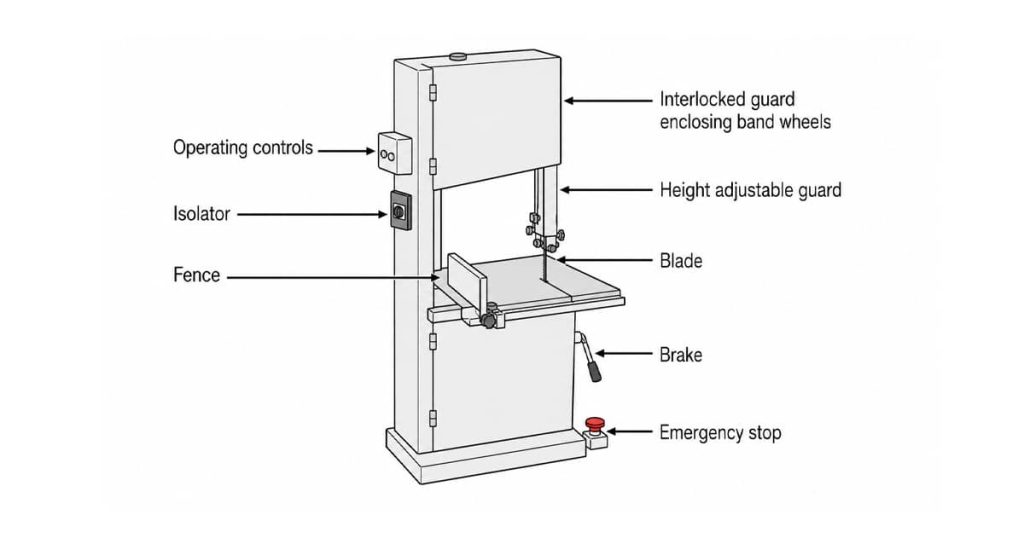
Blade Guard Positioning That Actually Protects You
The upper blade guard serves two purposes that directly affect your safety during every cut. First, it limits your exposure to the moving blade by covering as much of it as possible while still allowing the cut to happen. Second, it supports the blade itself, reducing the likelihood of breakage that can send metal fragments flying. The general guideline is to position the guard approximately 1/8 inch to 1/4 inch above your workpiece, close enough to provide meaningful protection without interfering with material movement. Many beginners set the guard once and forget about it, but adjusting this height for each different thickness of material you cut is a habit worth building from day one. Always make these adjustments with the machine powered completely off.
Quick Reference Guide for Bandsaw Blade Selection
| Material Thickness | Recommended Blade Width | Minimum Curve Radius | Best Tooth Count (TPI) |
| Under 1 inch | 1/4 inch | 5/8 inch | 10 to 14 |
| 1 to 2 inches | 3/8 inch | 1.5 inches | 6 to 10 |
| 2 to 4 inches | 1/2 inch | 2.5 inches | 4 to 6 |
| 4 to 6 inches | 3/4 inch | 5 inches | 3 to 4 |
| Over 6 inches | 1 inch or wider | Straight cuts preferred | 2 to 3 |
Why Dull and Damaged Blades Create Dangerous Situations
A blade that has lost its edge forces you to compensate in ways that increase your injury risk with every cut. When teeth become dull, the natural response is to push harder, which creates heat buildup, increases binding potential, and puts more strain on the blade itself. This extra pressure also means your hands are working harder, making a slip more likely at the moment when consequences would be worst. Beyond dullness, inspect your blades regularly for missing teeth, cracks near welds, and signs of metal fatigue. A quality bandsaw blade that is sharp and properly tensioned cuts smoothly with minimal effort, allowing you to maintain control throughout the operation. Replacing blades before they fail is far cheaper than dealing with the aftermath of a break.
Proper Feed Rate Techniques for Safer Cutting
- Allow the blade to establish its own cutting rhythm before applying steady forward pressure
- Watch the sawdust ejection pattern, which indicates whether you are feeding at an appropriate speed
- For curved cuts, slow down as the curve tightens to prevent blade deflection
- Use relief cuts when approaching tight curves so the blade does not bind in the kerf
- If the blade starts to wander or the motor bogs down, ease back rather than pushing through
- Practice on scrap material when working with unfamiliar wood species or densities
The Hidden Danger of Making Adjustments While the Saw Runs
This particular mistake appears repeatedly in injury reports, especially among those who learned on metalworking bandsaws where the temptation to tweak settings mid operation seems stronger. Adjusting blade tension, changing the tracking, or repositioning guides while the blade is moving creates opportunities for contact that would never exist with the machine off. The blade moves fast enough that your perception of where it is and where your hands are can become dangerously misaligned during split second adjustments. Make it an unbreakable rule: any change to the saw’s setup requires you to power down completely, wait for the blade to stop moving, and then proceed. This habit alone eliminates one of the most common pathways to serious bandsaw injuries.
ALSO WORTH READING
Want to Get More From Your Bandsaw?
If you’re looking to expand your bandsaw’s cutting capacity, a riser block might be exactly what you need. This simple add-on can transform your saw’s capabilities without requiring a whole new machine. Our guide on what a bandsaw riser block is covers everything from the key benefits to compatibility considerations, helping you decide if this upgrade makes sense for your workshop.
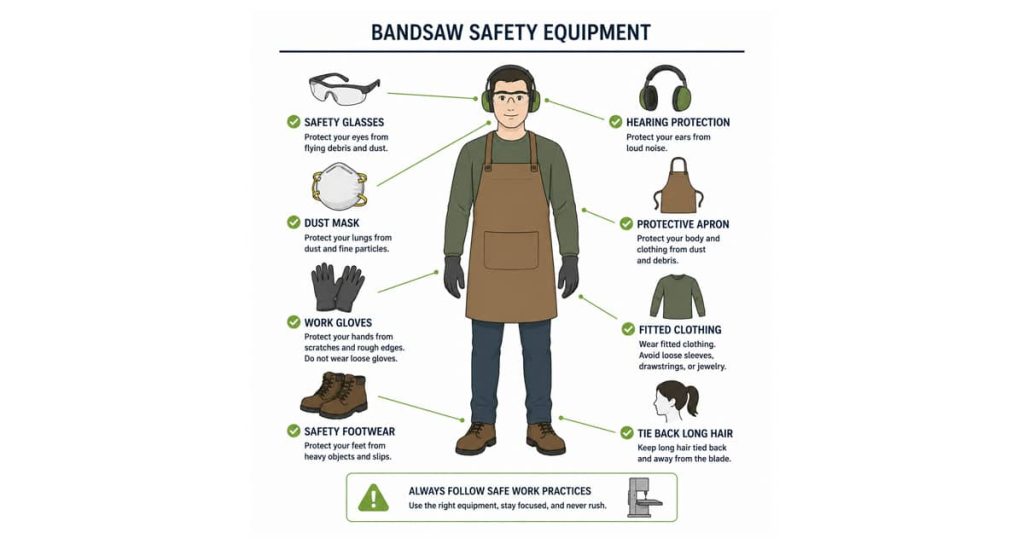
Essential Personal Protective Equipment for Every Session
- Safety glasses with side shields, worn from the moment you approach the saw until you step away
- Hearing protection for sessions lasting longer than a few minutes, as prolonged exposure adds up
- Fitted clothing with no loose sleeves, open cuffs, or dangling fabric near the blade path
- Closed toe shoes with non slip soles to maintain stable footing
- Hair ties for anyone with hair long enough to reach the blade or get pulled toward it
- A clear work area free of trip hazards that could cause you to stumble into the machine
What the Wheel Covers Are Really Protecting You From
Those large covers on either side of your bandsaw exist for reasons that become terrifyingly clear if you ever witness a blade break at full speed. When a blade snaps, the stored energy in that tensioned loop has to go somewhere, and without proper covers, that somewhere might include your face, arms, or anyone else in the shop. The right blade for your bandsaw matters here too, since improperly sized or damaged blades are more prone to catastrophic failure. Before every session, verify that both wheel covers are fully closed and latched. If your covers have worn latches or damaged hinges that prevent proper closure, address those issues before running the saw again. This is one of those safety features that seems unnecessary until the one time it proves essential.
Building a Pre Cut Safety Checklist
- Confirm the blade is properly tensioned and tracking centered on the wheels
- Position the upper guide approximately 1/4 inch above your workpiece thickness
- Verify both wheel covers are completely closed and secure
- Remove any cutoffs, tools, or debris from the table surface
- Check that the table is set at the correct angle for your cut
- Ensure adequate lighting on the work surface and blade area
- Clear the floor around the saw of any tripping hazards
- Confirm your push sticks are within easy reach for smaller pieces
Developing Long Term Bandsaw Safety Habits
The difference between beginners who stay safe and those who eventually have close calls often comes down to consistency in small practices rather than knowledge of safety principles. Knowing that you should keep your hands away from the blade matters far less than automatically keeping them there every single time. Bandsaw blades designed for specific tasks perform better and reduce the temptation to force cuts, which in turn supports safer operation. Build your habits now while you are still thinking consciously about each step, and they will serve you for decades. Spend your first weeks and months being almost overly cautious, because those patterns will persist long after you stop actively thinking about them.
Making Your Shop a Safer Place to Learn
Bandsaw safety ultimately comes down to respect for the tool combined with practical knowledge of where things go wrong. The mistakes covered here represent patterns that repeat across shops everywhere, not because woodworkers are careless, but because certain errors are easy to make without proper awareness. As you gain experience, your attention will shift from conscious safety checks to intuitive safe practice, but that transition requires building the right foundation first. Take your time with each cut, maintain your equipment properly, and never let familiarity breed the kind of comfort that leads to shortcuts. The bandsaw can be one of the most useful and genuinely enjoyable tools in your shop when you approach it with the knowledge and habits that keep every session incident free.